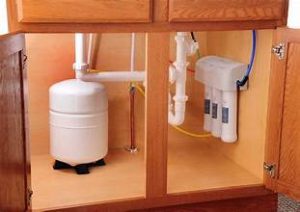
If you’re thinking about installing a reverse osmosis (RO) system in your home, you’re probably wondering how long the process takes. The good news? A professional installation is usually quick and hassle-free. In most cases, you can have clean, purified water in just two to four hours. However, there are a few factors that can impact the timeline. Let’s break it down so you know what to expect.
What Affects the Installation Time?
While a standard reverse osmosis system installation in Clearwater typically takes a few hours, here are some things that might speed up or slow down the process:
- Type of RO System – Under-sink systems are the most common and straightforward to install. Whole-house RO systems take longer since they connect to your main water supply.
- Existing Plumbing – If your plumbing is in good shape, installation is smooth. But if upgrades are needed, like adding a new shut-off valve or fixing old pipes, it could take longer.
- Location – The easier it is to access the area under your sink (or wherever you’re installing the system), the faster the job. Tight spaces or tricky layouts can add extra time.
- Additional Features – Some RO systems come with extra filters, pumps, or remineralization stages, which may require more setup time.
- Professional Installation – A professional plumber can usually get the job done faster and ensure there are no leaks or issues.
What to Expect During Installation
A professional RO system installation follows these steps:
- Shutting Off the Water Supply – The plumber will turn off the water and drain any remaining pressure from the lines.
- Mounting the RO Unit – The main filter system is installed inside your cabinet or on the wall, depending on your setup.
- Connecting to the Water Line – The RO system needs a direct connection to your cold water supply. A small saddle valve is often installed for this.
- Installing the Drain Line – The system produces wastewater, so a drain line is connected to your sink’s drain pipe.
- Mounting the Faucet – Most RO systems include a dedicated faucet for purified water, which is installed in your sink or countertop.
- Testing and Flushing – After all the connections are made, the system is tested for leaks and flushed to remove any residual carbon dust from the filters.
When Can You Start Using Your RO System?
Once the system is installed, you’ll need to let it flush for a few hours to ensure the filters are working properly. After that, your reverse osmosis system is ready to go! You’ll have clean, great-tasting water right from your tap. If you’re ready for professional reverse osmosis system installation in Clearwater, our team is here to help.
Contact The Clean Plumbers–The one with the bubbles on the trucks! Call Now For 24/7 Emergency Services.

